Tiger Face Paint: Easy Cheek & Full-Face Guide
Choose a quick beginner cheek design or the detailed intermediate full-face tiger.
A great tiger face paint relies on two fundamental skills: a smooth, blended base and confident, tapered stripes. While it looks complex, the tiger is actually one of the fastest full-face designs once you master the muscle memory of the stripes. This guide will walk you through achieving that perfect fierce look without spending 20 minutes in the chair.
Quick cheek tiger for beginners
For a smaller, easier design, use the cheek version below. Its configured seven-minute time is an approximate design estimate; actual painting time varies with practice, the child, and event conditions.
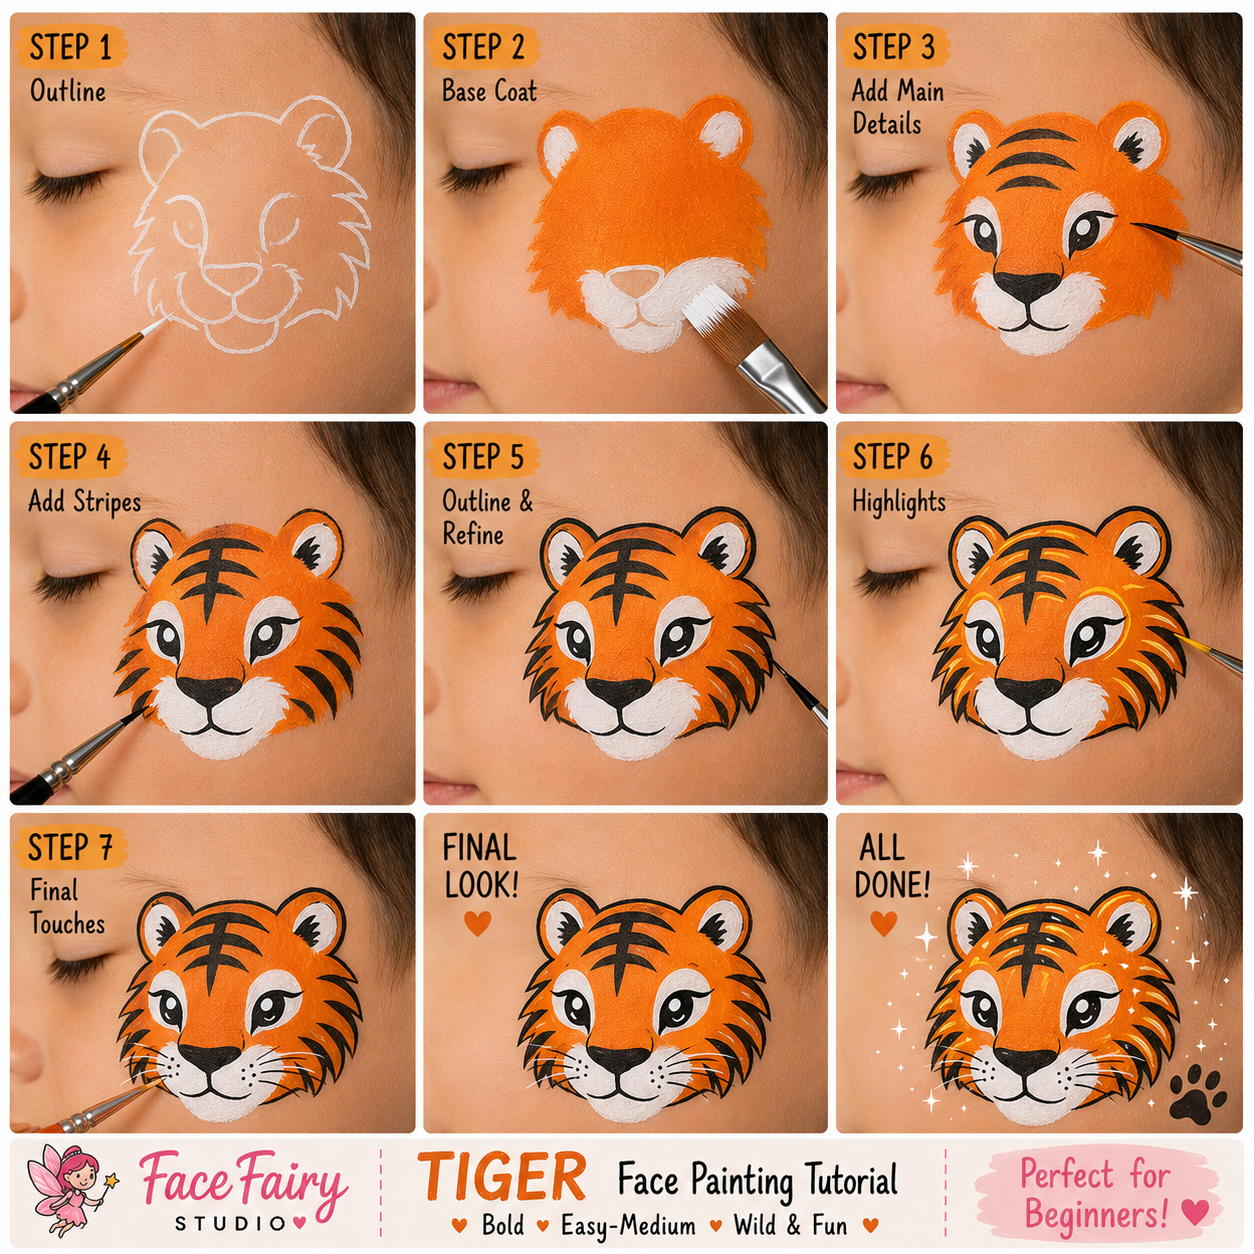
Cheek-version overview
- Shape a compact orange tiger base on the cheek or forehead.
- Add white muzzle and eye patches while keeping the design small.
- Paint a simple black nose at the center of the muzzle.
- Pull tapered black stripes inward from the forehead edge.
- Add shorter curved stripes along the cheek.
- Define the mouth and finish with whisker dots or fine whiskers.
- Add restrained yellow or white highlights and an optional paw-print accent.
Intermediate full-face tiger
The main tutorial below is the existing intermediate full-face version. Its configured 12-minute time is an approximate design estimate, not a universal painting speed.
Why is this design so popular?
The tiger is the ultimate classic face paint design. It immediately empowers kids, giving them an excuse to roar and play in character. It is incredibly visually striking, utilizing high-contrast colors (orange, white, and black) that stand out brilliantly in photos and from a distance.
Real Portfolio Examples
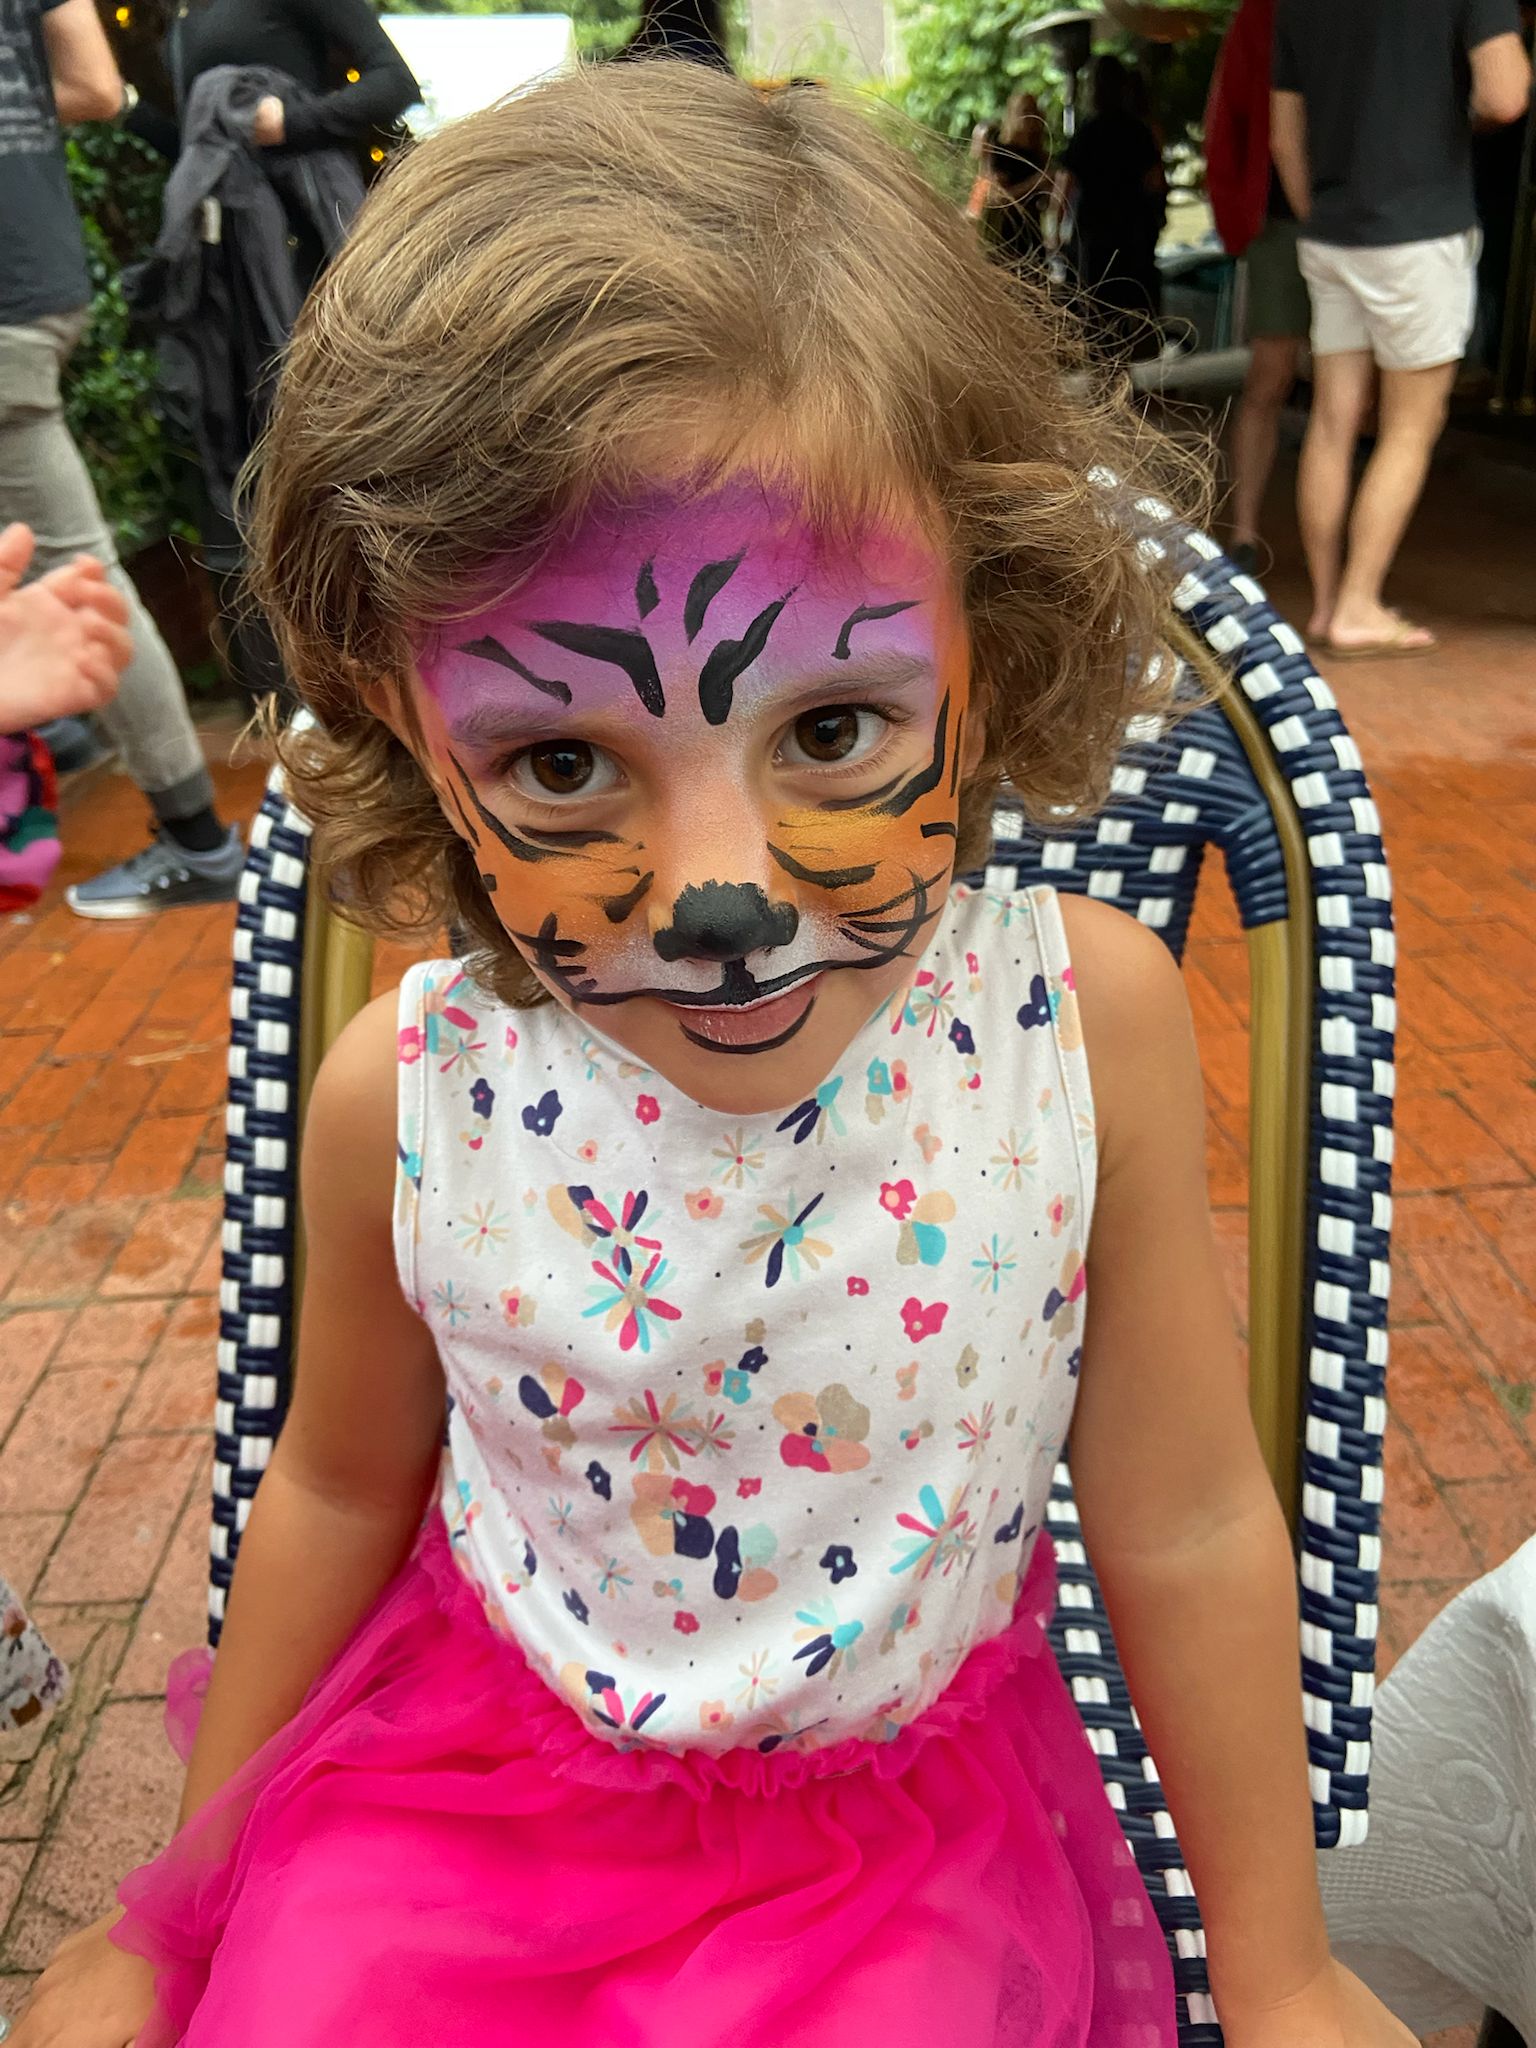
Tutorial Overview
Step-by-Step Instructions
Sponge the White Highlights
Start with your sponge loaded with white paint. Dab white above the eyebrows, down the center of the nose, and onto the upper lip/muzzle area. This creates the classic feline highlights.
Blend the Yellow and Orange Base
Load the other half of your sponge with yellow and orange. Sponge yellow around the inner cheeks and forehead, blending into the white. Then sponge bright orange on the outer edges of the face (temples, cheeks, and jawline), blending it into the yellow. This gradient gives the face a glowing, 3D effect.
Paint the Muzzle and Nose
Using a round brush and black paint, draw a small triangle or heart shape on the tip of the child's nose. Draw a line down the philtrum (the space between the nose and upper lip) and outline the upper lip in black. Add a few black dots to the white muzzle area where the whiskers will emerge.
Master the Teardrop Stripes
Switch to your #4 or #6 round brush loaded with black. Tiger stripes are essentially elongated teardrops. Press down firmly to create the thick base of the stripe, then slowly lift the brush as you drag it inward to create a sharp, fine point. Start with stripes pointing inward from the temples.
Add Forehead and Cheek Stripes
Paint 3-5 stripes pointing downward from the hairline toward the bridge of the nose. Add a few curved stripes on the cheeks, pointing toward the mouth. Ensure the stripes are symmetrical but varied in length for a natural look.
Paint the Whiskers
Using your finest detail brush, flick 3-4 thin, fast lines outward from the muzzle dots across the cheeks. A quick, confident flick is key to making whiskers look natural rather than heavy and drawn-on.
Add Fangs (Optional)
For an extra fierce look, use white paint to draw two small fangs extending downward from the bottom lip, and outline them lightly in black.
Common Mistakes to Avoid
✕ Blocky, Thick Stripes
Stripes that are the same thickness from end to end look like zebra crossings. Always use the "press-and-flick" teardrop technique so every stripe ends in a sharp point.
✕ Stripes Pointing the Wrong Way
Tiger stripes should generally point toward the center of the face (the nose and mouth). Stripes pointing randomly disrupt the focal point of the design.
✕ Skipping the Yellow Blend
Using only orange makes the face look flat. Blending yellow in the center and orange on the outside creates dimension and makes the tiger look much more realistic.
Professional Tips
🐅 Stripe Grouping
Instead of spacing stripes evenly like a ladder, group them in clusters of two or three. It looks much more organic and animalistic.
🖌️ Brush Consistency
To get sharp, perfect stripes, your black paint needs an ink-like consistency. Too dry, and the brush will drag; too wet, and the stripes will bleed into the orange base.
⚡ Speed Trick
Instead of sponging three separate colors, use an orange/yellow/white split cake and a large sponge to apply the base in one swipe across the forehead and cheeks.
Design Variations
- White Tiger Use a pure white and silver/grey base instead of orange. Add striking blue accents around the eyes before applying the black stripes.
- Rainbow/Neon Tiger A huge hit at festivals! Use a neon rainbow split cake for the base, then apply thick black stripes. It glows under UV light.
Safety & Skin Care
- Always remind kids not to eat or lick the paint around their mouth.
- If painting toddlers, avoid the mouth area entirely and just paint the nose and forehead stripes.
- Ensure your black paint is easily washable, as highly pigmented blacks can sometimes leave a faint shadow if not removed with soap.
Frequently Asked Questions
How do I get the sharp points on my tiger stripes?
It’s all about brush control. Press down firmly at the start of the stroke to lay down the belly of the brush, then slowly lift the brush off the skin while pulling the stroke forward. Practice this "press, pull, lift" motion on your arm.
What brush is best for tiger stripes?
A good quality round brush (size 4, 5, or 6) with a very sharp synthetic tip is essential. A flat brush will not give you the tapering effect needed.
How do I prevent the black paint from smudging?
Ensure your orange base is completely dry to the touch before you begin striping. If the sponge work is still wet, the black will bleed.
Design Information
- Makeup sponge (for base blending)
- Round brush #4 or #6 (for tiger stripes)
- Fine detail brush #1 (for whiskers)
- Small spray bottle with water
Available for parties across the Triangle.